Deck GuideEB05 Format

Monkey.D.Luffy ST10 Deck Guide

Red/Purple Luffy follows a precise progression: accelerate your DON!!, use Roronoa Zoro EB04-007 to become harder to attack, then reach your Monkey.D.Luffy OP05-119 + Nico Robin EB05-033 sequence.

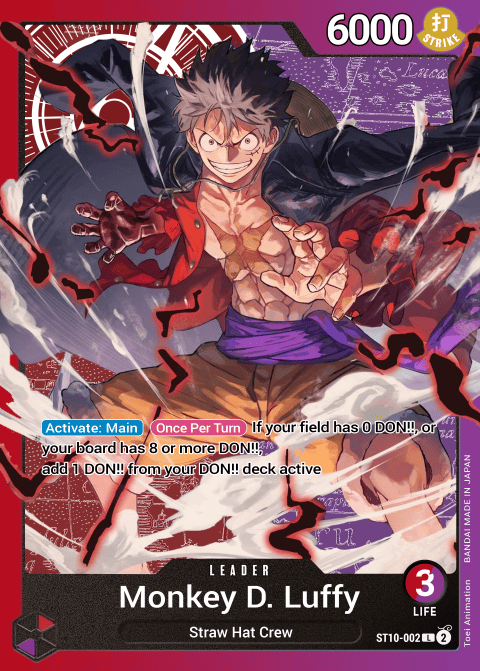
ST10-002 Monkey.D.Luffy Leader card

Decklist

ST10 Monkey.D.Luffy for the EB05 format.

Mulligan

Roronoa Zoro — Your Priority

Roronoa Zoro EB04 is one of the most important cards to find.

Your goal is to play him once you reach 7 DON!! to increase your Leader's Power and become much harder to attack. This protection is essential for buying the time you need before your big late-game turn.

Access to a second Zoro can also let you maintain this Power for one more turn if you are not ready to start your combo yet.

Keep a Ramp Source

You also want to start with a card that can accelerate your DON!! count.

Yamato OP17-074 and Mr.2.Bon.Kurei EB01-061 are among your main options for accelerating your progress and reaching the turn when you can play Zoro sooner.

Ramp is especially important because the deck needs to reach its major DON!! thresholds at the right time to chain its game plan.

Use Your Searchers to Complete Your Hand

Nami OP01-016, Jewelry Bonney EB04-002, Monkey.D.Garp OP13-016, and Thousand Sunny ST31-005 give you several ways to search for the different pieces you need.

Garp is especially useful because he can access cards your Straw Hat Searchers cannot find, including your Ramp options and Gold.D.Roger P-107.

Your opening hand therefore does not need to contain every combo piece directly: a good Searcher together with Ramp and Zoro already gives you a solid foundation.

Do Not Keep Nico Robin Without Her Setup

Nico Robin EB05-033 is essential to your big turn with Monkey.D.Luffy OP05-119, but she depends on Luffy to really work.

If you have to choose between the two, Luffy is generally more important because he is playable on his own, while Robin needs your sequence with Luffy to make full use of her effect.

Ideal Mulligan

Look primarily for a hand with:

a Ramp source + Roronoa Zoro EB04 + a Searcher.

If you already have these pieces, Monkey.D.Luffy OP05-119 becomes an excellent card to keep for your late game.

The goal is to secure your progression toward 7 DON!! for Zoro, then reach your Luffy + Robin turn safely enough.

Game Plan & Curve

Red/Purple Luffy follows a precise progression: accelerate your DON!!, use Roronoa Zoro EB04-007 to become harder to attack, then reach your Monkey.D.Luffy OP05-119 + Nico Robin EB05-033 sequence.

The decklist has several ways to Ramp and quickly reach its important thresholds. Once you are at 10 DON!!, Luffy gives you access to an extra turn, and Robin lets you rebuild a large part of the DON!! you just returned to your DON!! Deck.

Early Game — Search & Ramp

Start by playing Nami OP01-016, Jewelry Bonney EB04-002, Monkey.D.Garp OP13-016, or Thousand Sunny ST31-005 to assemble the different pieces of your plan.

Your main goals are to prepare your Ramp, find Roronoa Zoro EB04-007, then access Monkey.D.Luffy OP05-119 and Nico Robin EB05-033 for your late game.

Yamato OP17-074 and Mr.2.Bon.Kurei EB01-061 are among your main Ramp cards. Roronoa Zoro OP05-067 also contributes to this acceleration because he can Ramp 1 Active DON!! when he attacks.

Monkey.D.Garp OP13-016 complements your Straw Hat Searchers by accessing cards Nami and Bonney cannot find, including several of your Ramp cards and Gold.D.Roger P-107.

Roronoa Zoro OP05-067 — Accelerate Your DON!!

Roronoa Zoro OP05-067 helps you quickly increase your DON!! count.

When he attacks, his 1 Active DON!! Ramp lets you accelerate your progress while continuing to apply pressure.

This Active DON!! can also give you more flexibility during your turn: the goal is not only to reach 10 DON!! faster, but also to have enough resources to chain your different actions without giving up pressure.

7 DON!! — Roronoa Zoro EB04-007

Roronoa Zoro EB04-007 is one of the most important pieces for transitioning from your Ramp into your late game.

When you reach 7 DON!!, Zoro lets you increase your Leader's Power and become much harder to attack. This lets you save Counters and buy the time you need to reach your 10-DON!! turn.

This Power increase is not only for defense, however. Zoro also has an offensive dimension through his Rush Character options, letting you immediately pressure opposing rested Characters when the situation calls for it.

If your combo is not ready yet, playing another Zoro can let you keep your Leader's Power high for one more turn instead of rushing your late game.

Gold.D.Roger — Another Way to Maintain Your Power

Gold.D.Roger P-107 makes your plan more consistent when you do not have access to EB04-007 Zoro.

He gives you another way to maintain high Leader Power and survive long enough to play your late-game combo.

He also has the advantage of being accessible with Monkey.D.Garp, giving you another option when your Straw Hat Searchers cannot find the cards you need.

Thousand Sunny — Turn DON!! Into Pressure

Thousand Sunny ST31-005 lets you search and increase your Leader's Power.

The Stage becomes even more valuable during your late-game sequence: after you start rebuilding your DON!! with Luffy, your Leader, and Robin, you can use Sunny to attach a DON!! to your Leader and keep attacking at a meaningful value without using your Active DON!!.

10 DON!! — Monkey.D.Luffy + Nico Robin

Your main late-game sequence begins when you reach 10 DON!! with Monkey.D.Luffy OP05-119 and Nico Robin EB05-033 available.

After playing Luffy and returning your DON!! to your DON!! Deck, you can immediately start rebuilding your resources:

Leader effect → return to 1 DON!! → Luffy effect → return to 2 DON!! → play Nico Robin with your Active DON!!.

Robin then becomes the piece that lets you quickly recover a large part of the resources invested in Luffy.

Nico Robin — Rebuild Your DON!!

Nico Robin EB05-033 first lets you draw 3 cards, then discard 2, which helps improve your hand and find the cards you will need for the rest of the game.

She then lets you Ramp 4 DON!!, quickly bringing you back to 6 DON!! after your sequence with Luffy.

Your opponent's DON!! count is essential. For your sequence to work correctly, you generally want them to be far enough along their own curve, usually at 8 DON!!.

Therefore, avoid starting your Robin combo when your opponent is still only at 7 DON!!.

Quickly Return to 10 DON!!

Thanks to Robin's Ramp, you can start this turn at around 8 DON!!. You can then use your Leader to Ramp again.

You must then choose between two plans: try to finish the game immediately or secure your position for the next turn.

Secure the Game With Zoro + Gum-Gum Giant

If you do not have a sufficiently safe lethal, Roronoa Zoro EB04-007 can be one of your best options.

You can strengthen your Leader again while trying to keep enough DON!! for Gum-Gum Giant OP09-078.

This combination lets you end your Luffy + Robin sequence with high Leader Power and a major defensive option available during your opponent's turn.

You therefore do not need to turn your next turn into an all-in every time: if you can play Zoro while keeping Gum-Gum Giant available, extending the game can be much safer.

Sanji — Bypass Blockers to Finish the Game

Sanji ST21-003 becomes especially dangerous when your opponent is trying to survive behind several Blockers.

On the following turn, you can focus your DON!! on an unblockable attack and bypass their defense.

This attack can reach extremely high Power with Luffy OP09 in play when you have a lot of DON!! to invest. It is therefore a real lethal option, but it should not push you into taking an unnecessary risk when you can simply secure the game with Zoro and Gum-Gum Giant.

Your Overall Plan

Your ideal progression therefore looks like this:

Searchers → Ramp with Yamato / Mr.2 / Zoro OP05-067 → Roronoa Zoro EB04-007 at 7 DON!! → maintain high Leader Power → reach 10 DON!! → Monkey.D.Luffy OP05-119 → Nico Robin EB05-033 → rebuild your DON!! → lethal or Zoro EB04-007 + Gum-Gum Giant to secure the game.

The strength of this sequence comes from the fact that Monkey.D.Luffy does not mark the end of your resources. Nico Robin lets you immediately rebuild your DON!! and make full use of Luffy's extra turn, while Zoro gives you a way to stay solid enough to reach that late game.

Tech Cards

Nico Robin EB05-033

Nico Robin is the piece that makes your combo with Monkey.D.Luffy really work.

After returning your DON!! to your DON!! Deck with Luffy, you can use your Leader and then Luffy to recover enough DON!! to play Robin.

She then lets you draw 3 cards and discard 2 before Ramp 4 DON!!. You therefore improve your hand while immediately rebuilding your resources for Luffy's extra turn.

Simply pay attention to your opponent's DON!! count: you generally want to start this sequence when your opponent is at 8, not 7.

Roronoa Zoro EB04-007

Zoro is your main way to survive until your late game.

His Power increase makes your Leader much harder to attack and considerably reduces the amount of Counter needed to defend your Life.

He also has real offensive utility through his Rush Character option. You can use Zoro to immediately attack rested Characters and force your opponent to spend Counter to protect them.

In some situations, it is better to play another Zoro instead of forcing lethal: you remain difficult to attack and can keep DON!! for Gum-Gum Giant.

Roronoa Zoro OP05-067

Zoro OP05-067 provides another source of Ramp in the decklist.

When he attacks, he can let you Ramp 1 Active DON!!, accelerating your progress toward important thresholds while maintaining pressure.

He therefore complements Yamato and Mr.2 in your DON!! acceleration plan.

Yamato OP17-074

Yamato is one of your main Ramp cards.

She helps you reach your Zoro and then Luffy + Robin turns sooner, while also playing a Character Blocker onto the board.

Her role becomes especially important when your hand already contains your big pieces but you are simply missing the acceleration needed to follow your curve.

Mr.2.Bon.Kurei EB01-061

Mr.2 gives you both Ramp and a threat your opponent cannot always ignore.

He is one of the cards you can search with Monkey.D.Garp, improving your access to Ramp even when your Straw Hat Searchers cannot find him.

Gold.D.Roger P-107

Roger makes your plan more consistent when you do not find Roronoa Zoro EB04-007.

He is another option for strengthening your Leader and helping you hold on until your Luffy + Robin turn.

His presence also makes Monkey.D.Garp OP13-016 more valuable, since Garp can search for him along with several of your Ramp cards and other tech options.

Rakuyo OP17-016

Rakuyo is mainly included for specific matchups.

He is especially useful against Purple Enel, Elbaf decks, and Green/Blue Luffy. In these matchups, he can answer important Characters and is one of your main tech cards.

The main issue is that Rakuyo is not accessible with your Searchers. You therefore cannot always count on him, which is limiting in the matchups where he is especially strong.

Monkey.D.Garp OP13-016

Garp considerably expands your search options.

Nami and Jewelry Bonney already cover much of your Straw Hat package, but they cannot find certain important cards such as Mr.2, Yamato, Rakuyo, or Roger.

Garp therefore gives you access to a different part of your decklist and reduces your dependence on a single type of Searcher.

ST21-003 Sanji

Sanji is your option for bypassing Blockers.

He is most valuable during your lethal turns, when your opponent has enough Blockers to absorb your big attacks.

You can then invest heavily in DON!! for a huge unblockable attack and force your opponent to defend only with Counters from their hand. Otherwise, he is still a 2000 Counter.

Gum-Gum Giant OP09-078

Gum-Gum Giant is your main safety option when you cannot finish the game immediately.

After your Luffy + Robin sequence, you can choose to play Roronoa Zoro EB04-007 while keeping enough DON!! for Giant.

This option keeps you from having to go all-in every time: if lethal is not safe enough, Zoro + Gum-Gum Giant lets you maintain a much harder-to-overturn position.

Mamaragan OP15-078

Mamaragan is mainly used as Counter early in the game to refresh your hand.

It can also be used with its Activate: Main to rest a Character with 5000 Power, but this use is much more situational.

In most situations, its main function is therefore its +1000 Counter and the option to draw a card.

Matchups

OP09 Buggy

The Buggy matchup is mainly about holding on until your late-game sequence without losing too many defensive resources.

Try to play Roronoa Zoro EB04-007 quickly. The increase to your Leader's Power makes opposing attacks much more difficult and helps you preserve your Counters.

Use your Ramp to reach your Monkey.D.Luffy + Nico Robin turn before Buggy can fully take control of the board.

As you prepare your Luffy turn, consider which Characters Buggy can send to the bottom of your deck. You can accept losing a less important piece if that protects the cards needed for your combo.

Once Luffy + Robin are active, you can immediately rebuild your DON!! and use the extra turn to apply a great deal of pressure. If you have Gum-Gum Giant, you can also choose a safer line with Zoro instead of forcing lethal.

OP16 Green/Blue Luffy

This matchup can become very difficult if you do not find Roronoa Zoro EB04-007.

Zoro is especially important for increasing your Leader's Power. Without this protection, the many opposing attacks can quickly exhaust your hand.

Rakuyo OP17-016 is one of your best tech cards in this matchup, even though your Searchers cannot find him.

Do not hesitate to use your offensive options to remove important rested Characters. Reducing the number of opposing attacks makes your defense considerably easier.

After your Luffy + Robin combo, do not necessarily force lethal. If you can play Zoro and keep Gum-Gum Giant, you can build a much safer position before finishing the game.

EB04 Jewelry Bonney

Against Bonney, your goal is still to reach your Luffy + Robin turn, but you need to adapt your timing to the opponent's defensive tools.

Roronoa Zoro EB04-007 lets you maintain high Leader Power and hold on more effectively while preparing your late game.

Try to reduce your opponent's Life before your big turn. Your second turn with Luffy becomes much more dangerous if Bonney is already at 0 Life.

Monkey.D.Luffy OP05-119 is especially useful when the opponent uses effects to strengthen their Characters or Blockers during your first turn: your second turn lets you start again from a new position and continue your pressure.

Keep Gum-Gum Giant when it lets you both survive and preserve enough resources to play Luffy on the following turn.

OP14 Red Law

Red Law is the most difficult matchup.

His Jewelry Bonney EB05-001 is especially problematic: her Power reductions can cancel a large part of the defensive advantage gained with Roronoa Zoro EB04-007.

Law can develop his board, keep a large hand, and pressure your Leader at the same time. You can therefore run out of Counter quickly.

Your Ramp Characters are also difficult to keep on the board since Law has the tools to remove them quickly.

Even so, try to find Zoro early enough and progress toward your Luffy turn. The more the game forces you to defend before reaching your combo, the more difficult the matchup becomes.

OP15 Purple Enel

Rakuyo OP17-016 is one of the best cards to have in your opening hand.

Look to develop your Ramp as usual while playing Rakuyo when you have access to him.

Rakuyo is an important answer to the cards Purple Enel uses and can keep the opponent from comfortably holding onto their utility pieces.

Continue preparing your Zoro → Luffy + Robin plan rather than diverting all your resources into board control.

Elbaf Deck

Rakuyo is also included in the decklist to improve your options against Elbaf decks.

Rakuyo OP17-016 is your main tech card in this matchup.

Your overall plan is still to Ramp quickly so you can reach Zoro and then your late-game sequence.

Do not rely on Rakuyo alone, however: he is not searchable, and some games will have to be played without access to him.

If you already have the essential pieces of your combo, Monkey.D.Garp can help you find cards outside your Straw Hat engine.

Tips

Build your game around Roronoa Zoro EB04-007. Reaching Zoro early enough lets you increase your Leader's Power and save a lot of Counter before your Luffy + Robin turn.

Use Roronoa Zoro OP05-067 to accelerate your curve. His 1 Active DON!! Ramp when he attacks helps you reach your different thresholds sooner while maintaining pressure.

Do not play Nico Robin too early. Before starting your sequence with Monkey.D.Luffy, check your opponent's DON!! count.

Prepare Luffy and Robin together. Monkey.D.Luffy can be used on his own, but Nico Robin depends much more on this combination. If you have to choose between them while searching, Luffy may therefore be the priority.

Use Robin to prepare what comes next immediately. Her draw 3, then discard 2 is very useful for generating resources: use it to improve your hand and find Zoro or the cards needed for your second turn.

Remember Thousand Sunny. A rested DON!! can be attached to your Leader or Luffy Character to turn a resource you could not otherwise spend into additional Power.

Do not always force lethal during Luffy's extra turn. If you can play Roronoa Zoro EB04-007 and keep enough DON!! for Gum-Gum Giant, this position may be much safer than an uncertain all-in.

Keep Sanji ST21-003 in mind against Blockers. When your opponent is trying to survive behind several Blockers, you can focus your DON!! on a huge unblockable attack and bypass that defense entirely.

Use EB04-007 Zoro offensively when needed. His value is not limited to increasing your Leader's Power: his Rush Character options can let you immediately attack an important rested Character and force Counter.

Keep Rakuyo for the matchups where he matters. He is included especially for Purple Enel, Elbaf, and Green/Blue Luffy, but your Searchers cannot find him. When you naturally have him in hand in these matchups, avoid using him as Counter.

Mamaragan can mainly be used to refresh your Counter. Its Activate: Main effect is situational; using its +1000 Counter and drawing a card may be more useful when you are still looking for the pieces needed for your combo.